
August 25, 2020
Since the start of 2019, Fred’s Appliance and Fluid Services are both 100% remote operations. Every single employee is working from their homes. We have been getting a lot of questions on how we set up our own team to work from home. This article will be one of many that will cover specifics in getting your operation set up to work from home. COVID has made working from home mainstream but we’ve been striving to go 100% remote before COVID. Our productivity and employee morale has increased with this push to working from home leading to happier customers and more business.
Other Related Articles
WINDOWS SETTINGS
Now that installation is complete, Windows needs some settings adjustment.
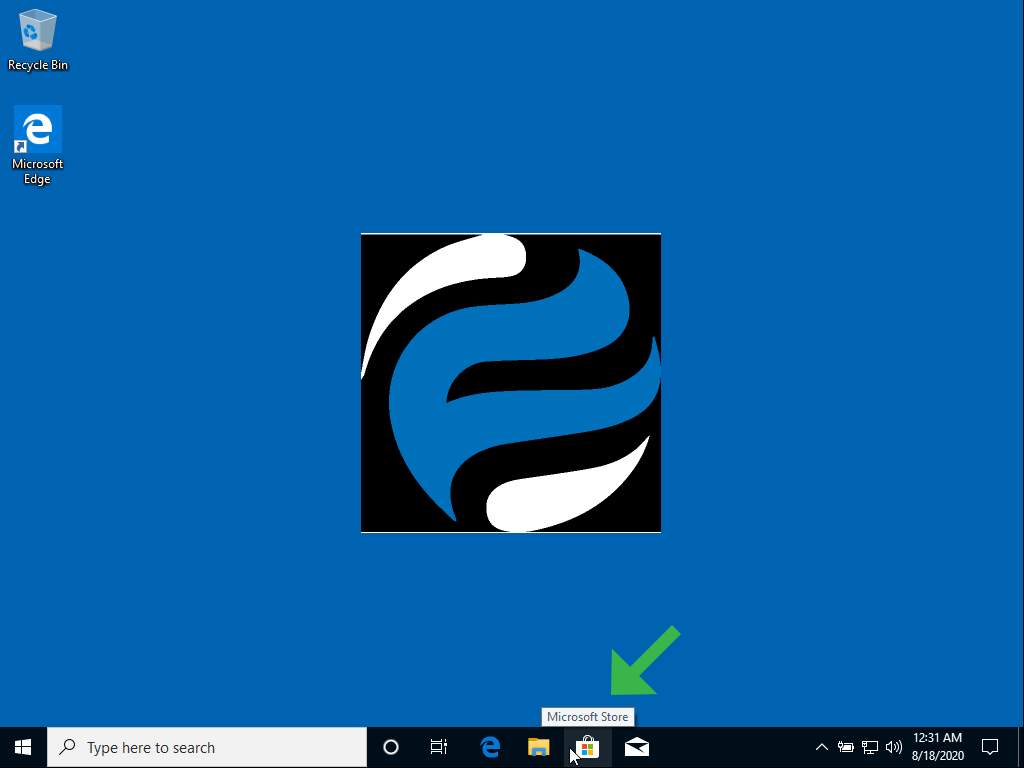
First, click on the Windows Store icon in the taskbar at the bottom of the screen.
After the store loads, click on the 3 horizontal dots near the top right corner of the window.
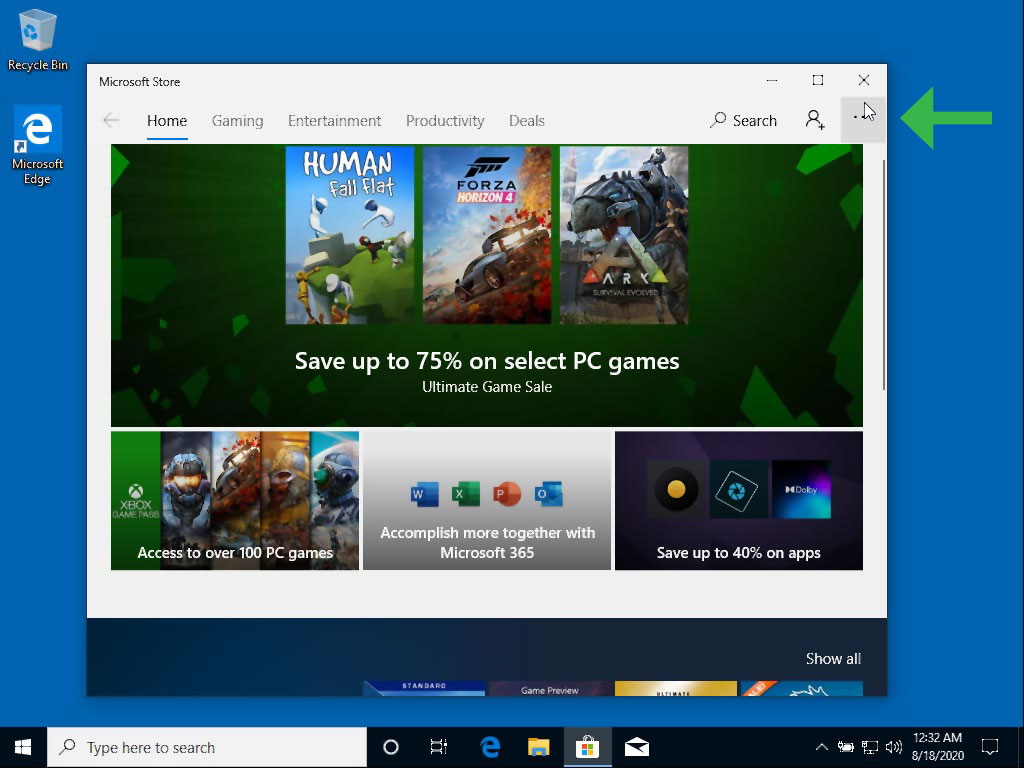
The store settings window will open.
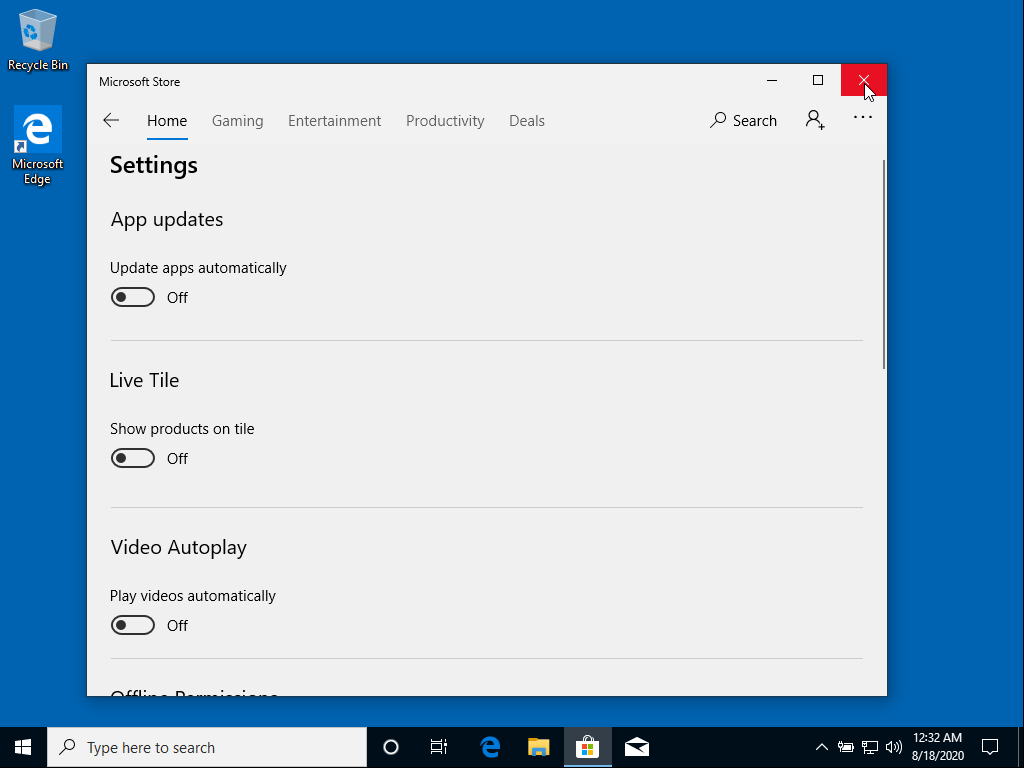
Change the “Update apps automatically” setting to Off.
Change the “Show products on tile” setting to Off.
Change the “Play videos automatically” setting to Off.
Then, close the store by clicking the X in the top right corner.

If you are unable to access the internet, skip Google Chrome installation.
Download and install Google Chrome by using Microsoft’s built-in browser, Edge.
You will find the shortcut for Edge on the desktop.

WINDOWS UPDATE
You’ll want to update Windows next before adjusting any Windows Settings.
Click on the Start button in the bottom left, on the taskbar.

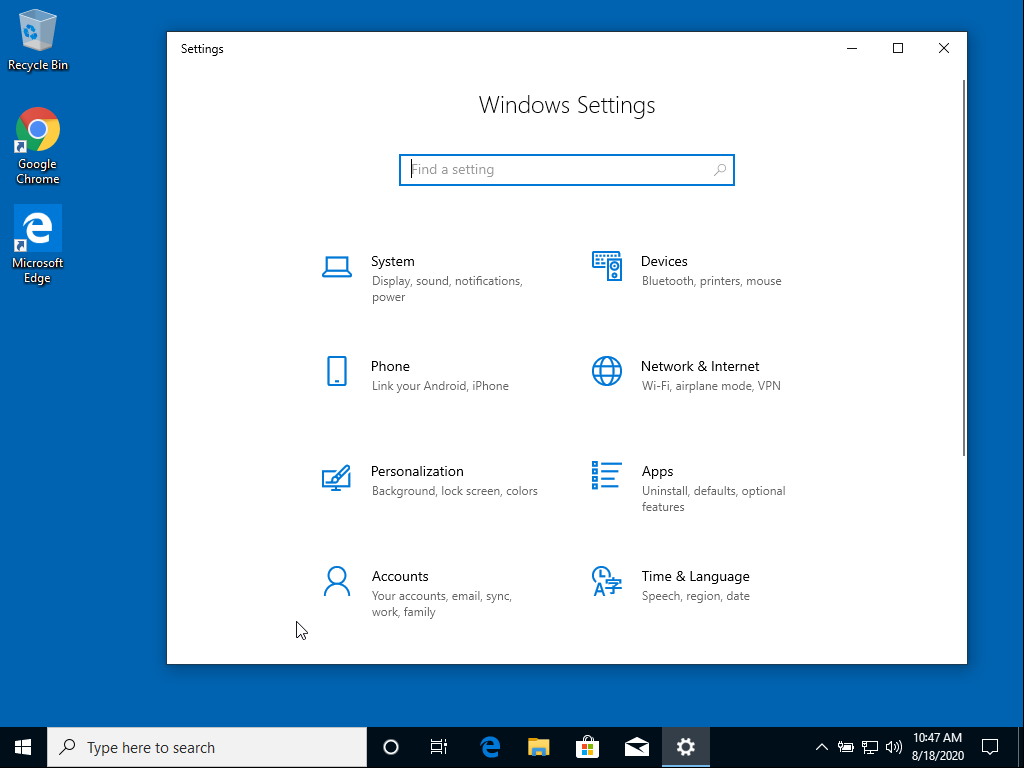
Select the gear icon on the left side of the Start Menu when it opens.

The Windows Settings window will open.
If you are unable to access the internet, skip Windows Updates.
Select Update & Security from the list of options

Windows Update may already be searching for updates.
If it is not, click on the “Check for updates” button near the top-center of the window.
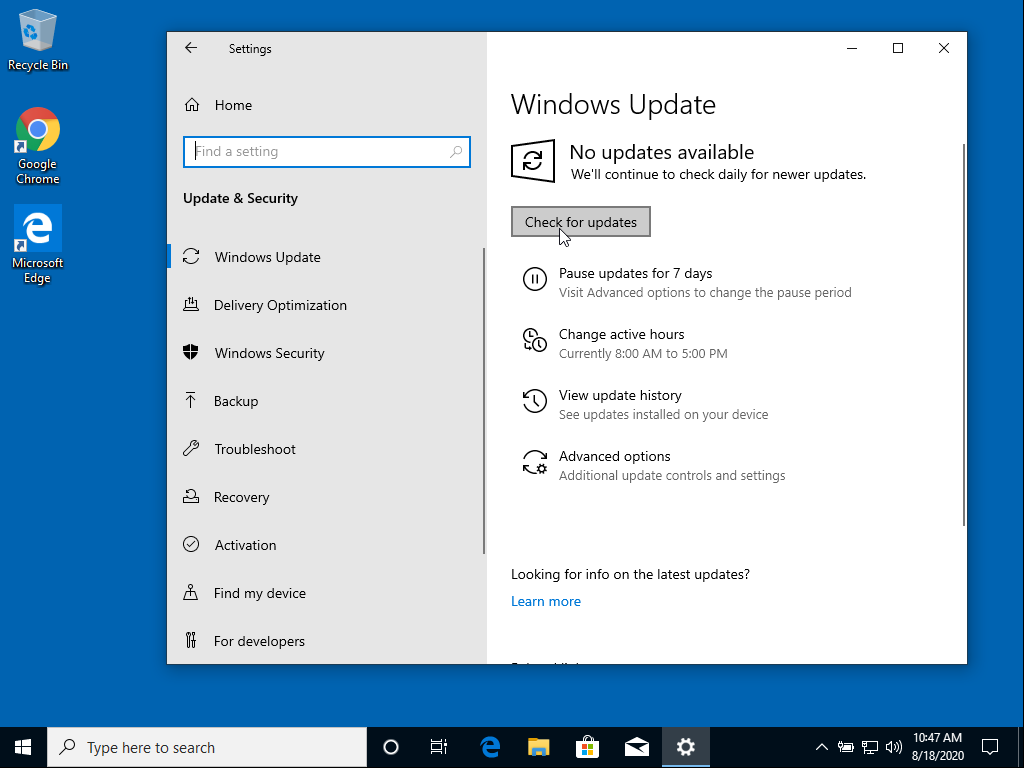
Windows will search for updates and will begin downloading them, if they are available.

Windows will automatically install some updates but some will require a restart.
When all updates are finished downloading, click Restart now when prompted.

After the restart, or after all updates having finished installing, check for more updates by following the previous steps again.
Repeat these steps until Windows Update confirms that Windows is up-to-date.

Reopen the Windows Settings window from the Start Menu.
This guide will be covering many settings options but not all.
Most settings will be changed for performance and privacy reasons.
System
Select System from the categories.

Display
Display will be the first subcategory that appears on this screen.
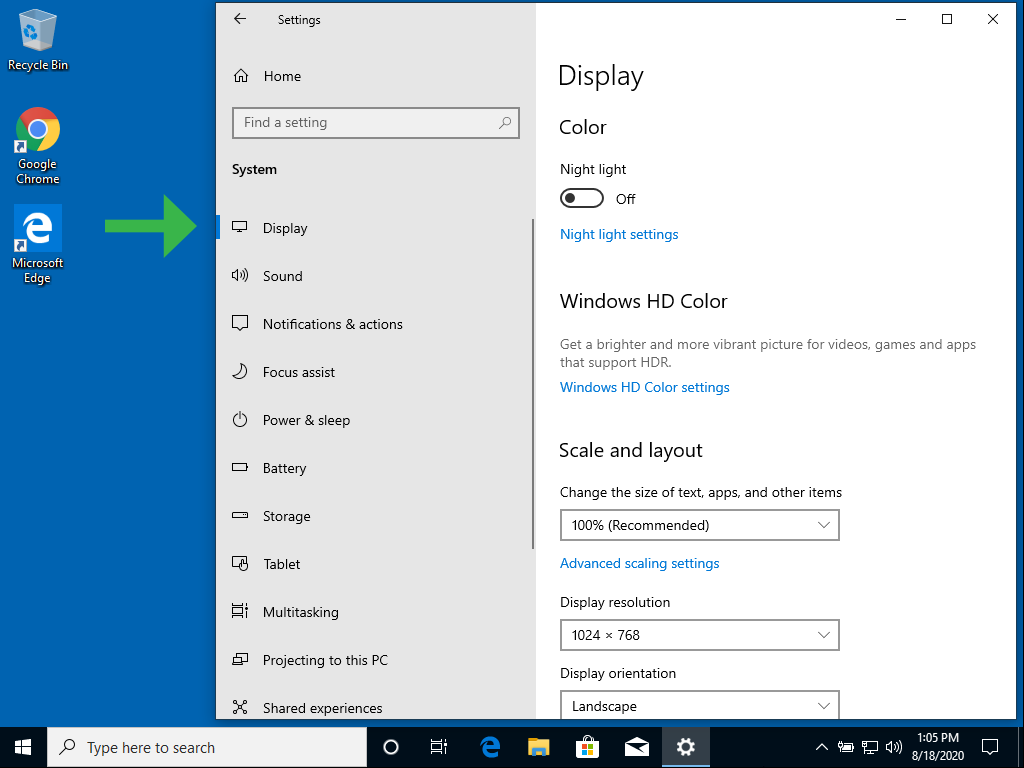
Ensure that the scaling of Windows is set to 100%.
This setting affects print margins, layouts, and spacing of documents, spreadsheets, and various other file types. This will affect how these files print and display on other computers.

If the dropdown for scaling is grayed out and cannot be changed, select Advanced scaling settings right below it.
Set the Custom scaling size to 100, click Apply, and then click the back arrow in the top left corner of the window.

Changes to scaling settings will not take effect until the next restart or sign-in.
Next, choose the proper Display resolution from the dropdown list.
We recommend setting the Display resolution to the Recommended setting since this is typically the native resolution of your display.

This setting will need to be revisited if the drivers for the graphics card have not yet been installed.
For those that find the Recommended resolution too small, try the following resolutions to see if they help. These are listed by monitor ratio (16:9 is the most common).
16:9
1920 x 1080, 1600 x 900, and 1280 x 720
4:3
1600 x 1200, 1440 x 1080, and 1280 x 960
We don’t recommend going lower than the smallest resolutions listed here because it can cause opened programs to display larger than the visible screen.
Notifications
Select Notifications & actions from the subcategory list.
Uncheck all 6 checkboxes first and then set “Get notifications from apps and other senders” to Off.

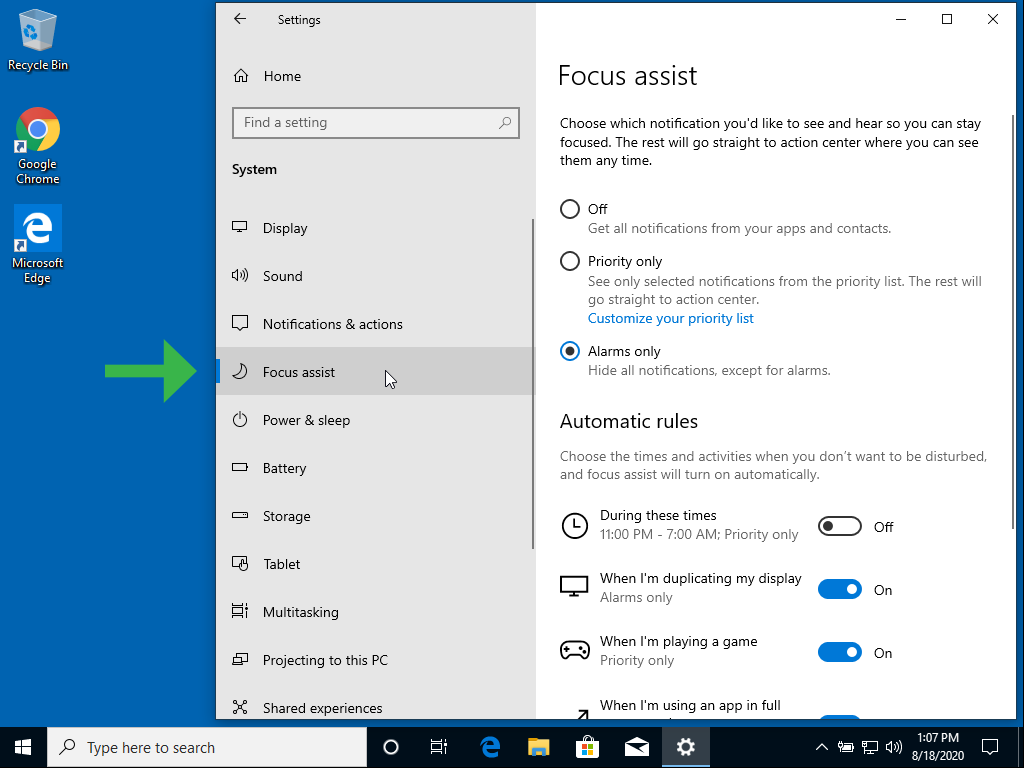
Focus assist
Select Focus assist from the subcategory list.
Click on the circle next to Alarms only.
Power & Sleep
Next, select Power & Sleep from the subcategory list.
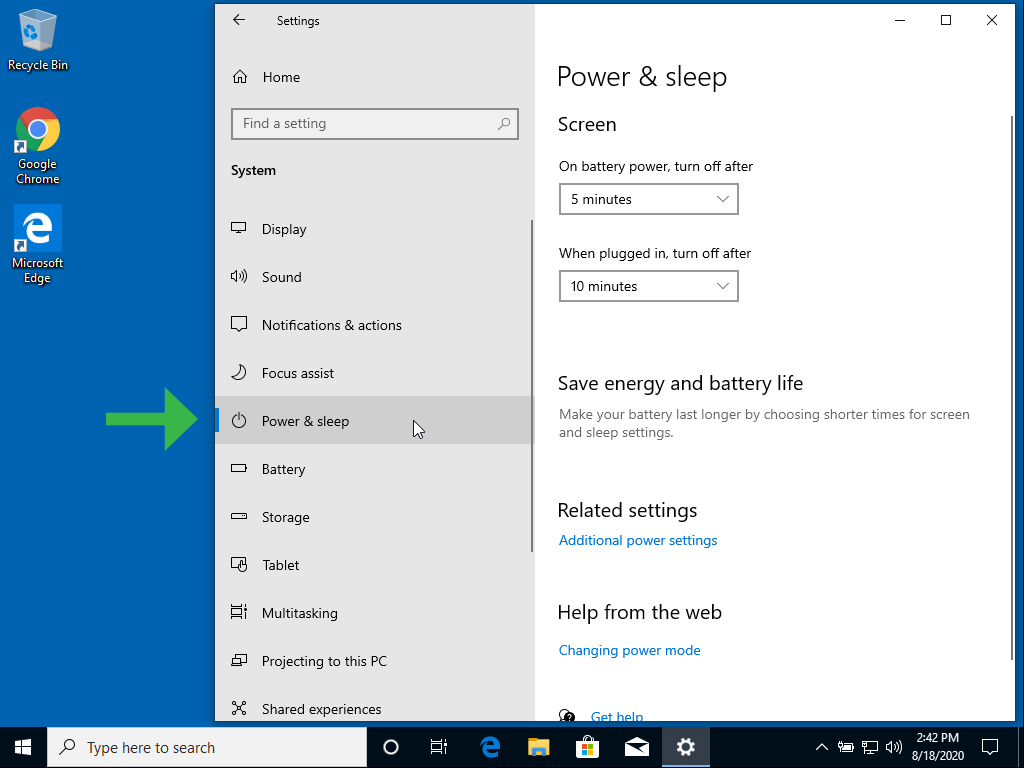
Click on “Additional power settings” under Related settings.
The Power Options window opens.

The next steps will depend on whether the computer is a desktop or laptop and if the storage being used is a Hard Disk Drive (HDD) or Solid State Drive (SSD).
Sleep, for example, can cause freezing issues when active with SSDs.
Click on “Choose what the power buttons do” on the right side of the window.

On the next screen, click on “Change settings that are currently unavailable”.
This allows changes to be made to the grayed out checkboxes.
The recommended settings for desktops with an SSD:

The recommended settings for desktops with an HDD:

The recommended settings for laptops with an SSD:

The recommended settings for laptops with an HDD:

Click on Save changes on the bottom right of the window and it will return to the previous screen.
Click on “Change plan settings” to the right of the Selected plan.

The screen changes to the Edit Plan Settings screen.
Click on “Change advanced power settings”.

The Advanced settings window opens.
Under the option “Turn off hard disk after”, all options need to be changed to 0 minutes (Never).
Laptops will have the options “On battery” and “Plugged in” and desktops only have one option called “Setting”.

Click Apply, then OK, and the window will close.
Next, click Save changes to return to the first Power Options screen.

Close the Power Options window by clicking the X in the top right corner.
Back on the settings screen for Power & Sleep, change the Screen and Sleep timers.
Recommended settings for computers with an SSD:
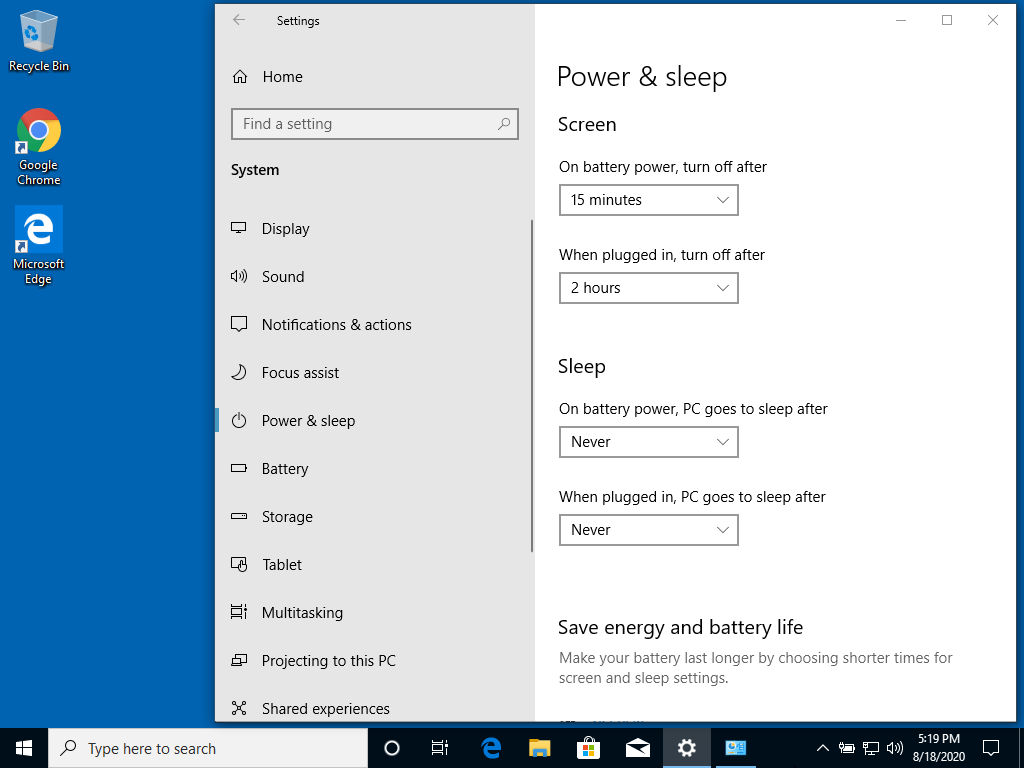
Recommended settings for computers with an HDD:

There will only be “When plugged in” settings for desktop computers.
Multitasking
Select Multitasking from the subcategory list.
Under Timeline, turn Off the “Show suggestions on your timeline” setting.

About
The last subcategory to select is About.
The only thing to do here is change the computer name, if necessary.
To do this, click on the “Rename this PC” button.

This will open the Rename your PC window.
Enter the desired name in the text box using the criteria shown.
Click Next, then click Restart later, and the window will close.

The name change is applied on the next computer restart.
Click the back arrow on the top left corner of the Settings window to return to the category screen.
Devices
Select Devices from the categories.

Printers & scanners
Select Printers & scanners from the subcategory list.
Uncheck the checkbox next to “Let Windows manage my default printer”.

Click the back arrow on the top left corner of the Settings window to return to the category screen.
Personalization
Select Personalization from the categories.

Colors
Click on Colors in the subcategory list.
Here you can change the color mode of Windows between Light and Dark.
Dark mode reduces eye strain when used but it is up to personal preference.
Switch the “Transparency effects” setting to Off.

Themes
Select Themes from the subcategory list.

Click on the option “Desktop icon settings”.
This will either be in the right hand margin of the Settings window or it will be at the bottom of the Themes section.
It opens the Desktop Icon Settings window.
Check the checkboxes next to Computer, Control Panel, and Network.
Click Apply, then OK, and the window closes.

Start
Select Start from the subcategory list.
Change “Show suggestions occasionally in Start” setting to Off.

Click on “Choose which folders appear on Start” and it switches to that screen.

Change the “Downloads” and “Network” settings to On.

Click the back arrow on the top left corner of the Settings window to return to the category screen.
Apps
Select Apps from the categories.

Default apps
Select Default apps from the subcategory list.

Scroll down to the “Web browser” option and click on it where it says Microsoft Edge.

Select Google Chrome from the menu that appears.
This will set Google Chrome as the default web browser in Windows.

After the browser is set, click on “Choose default apps by file type”.

A list of file types and their respective default apps will load and may take a couple minutes to populate entirely.
Scroll down the list and find .pdf and click where it says Microsoft Edge.
Select Google Chrome from the menu that appears.
This will set Google Chrome as the default .pdf viewer in Windows.
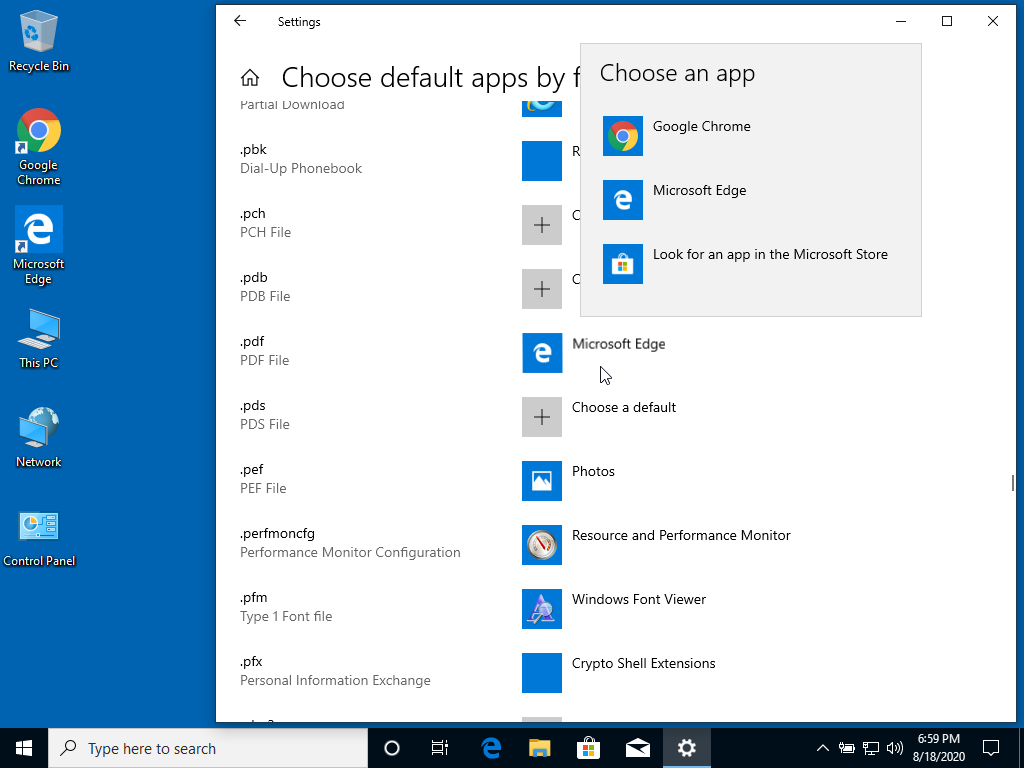
Click the back arrow in the upper left corner of the window to go back to the previous screen.

Startup
Click on Startup in the subcategories list.
Change the “Microsoft OneDrive” setting to Off.

Click the back arrow on the top left corner of the Settings window to return to the category screen.
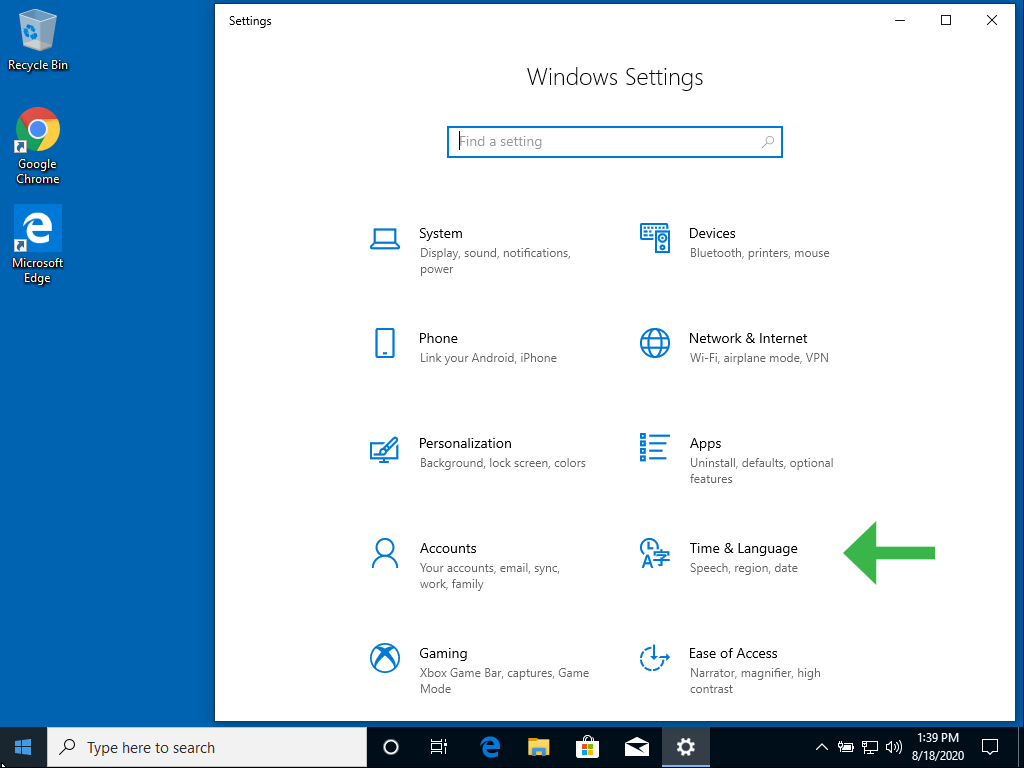
Time & Language
Select Time & Language from the categories.
Date & time
Select Date & time from the subcategory list.
Change the setting for “Set time zone automatically” to On.
Click the “Sync now” button.

Sometimes Windows does not sync the time zone or the time properly and it will not sync at all if the internet is not connected.
If this happens, turn the “Set time zone automatically” setting back to Off.
Select the correct time zone from the “Time zone” dropdown.
The correct date and time can be verified by checking the date and time in the taskbar.
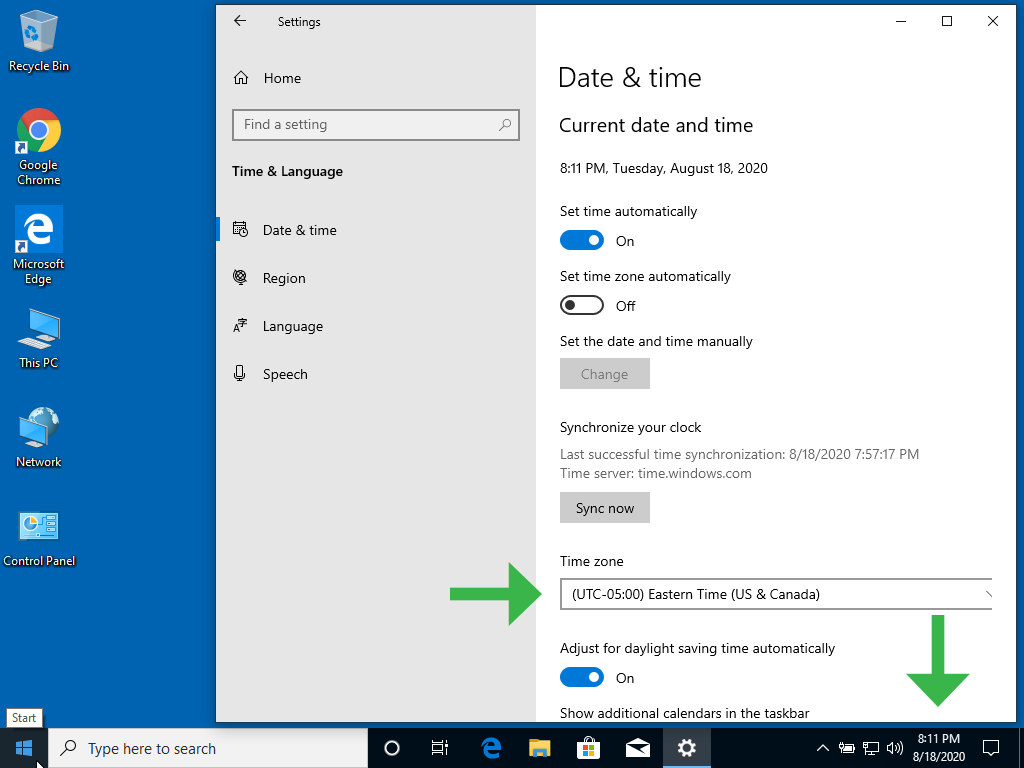
If the time or date are still incorrect, turn the “Set time automatically” setting to Off.
Click the Change button under the “Set date and time manually” option and the Change date and time window will open.
Select the correct date and time values from the dropdown boxes and click Change at the bottom right of the same window.

After the date and time are corrected, turn the “Set time automatically” setting back to On.
Click the back arrow on the top left corner of the Settings window to return to the category screen.
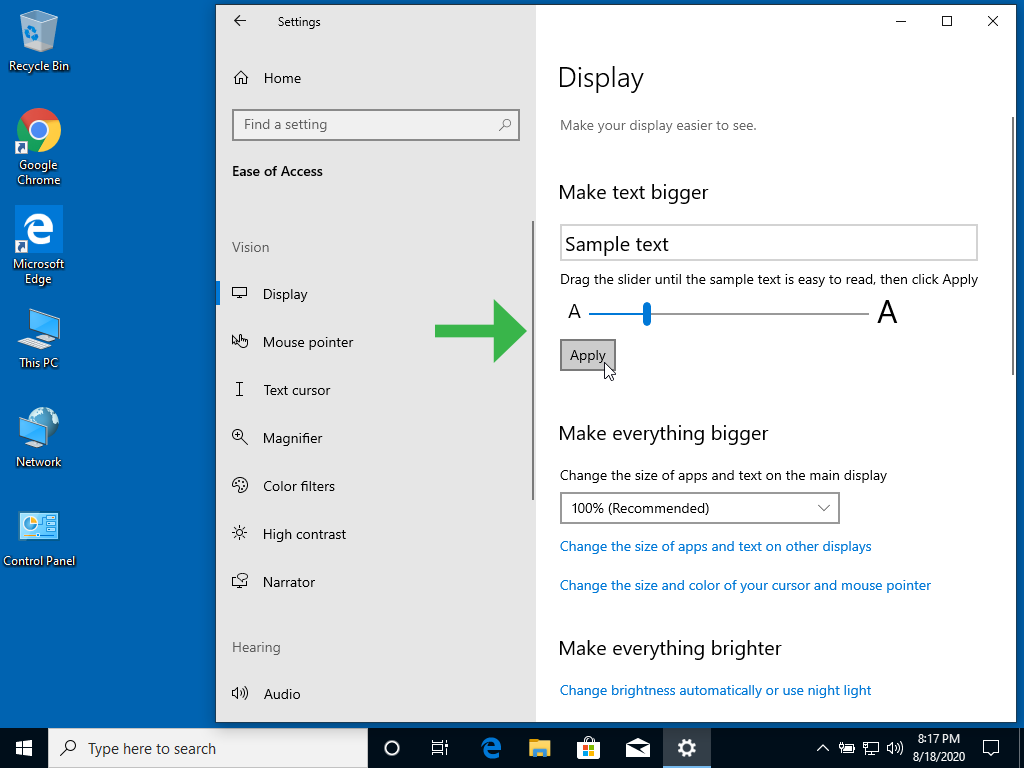
Ease of Access
Select Ease of Access from the categories.

Display
Select Display from the subcategory list.

If the text in Windows is difficult to read, use the “Make text bigger” slider to adjust the text size without affecting the scaling of Windows.
Click Apply when the desired text size is selected.
Scroll down to the “Simplify and personalize Windows” section.
Change the “Show transparency in Windows” and “Automatically hide scroll bars in Windows” settings to Off.

Click the back arrow on the top left corner of the Settings window to return to the category screen.
Privacy
Select Privacy from the categories.

General
Select General from the subcategory list.
Change the “Let apps use advertising ID to make ads more interesting…” setting to Off.
Change the “Let Windows track app launches…” setting to Off.
Change the “Show me suggested content in the Settings app” setting to Off.

Notifications
Scroll down the subcategory list and select Notifications.
Change the “Allow apps to access your notifications” setting to Off.

Other devices
Scroll down the subcategory list and select Other devices.
Change the “Communicate with unpaired devices” setting to Off.

Background apps
Select Background apps from the subcategory list.
Change the “Let apps run in the background” setting to Off.

App diagnostics
Select App diagnostics from the subcategory list.
Change the “Allow apps to access diagnostic info about your other apps” setting to Off.

That completes the changes to Windows Settings.
Close the Settings window by clicking the X in the top right corner.
Optional
If your system is using a Solid State Drive (SSD) for Windows, performance and speed can be further increased by de-indexing the drive.
Do not perform these actions for a mechanical Hard Disk Drive!
Additionally, this process can take up to 2 hours, should not be canceled once started, and makes Windows unavailable until it has completed.
Double click on the “This PC” icon on the desktop and it will open an Explorer window.

Right click on “Local Disk (C:)” (or whichever drive letter that Windows is installed on).
It will open a menu.
Left click on Properties in the menu and the Local Disk properties window will open.

Uncheck the checkbox next to “Allow files on this drive to have contents indexed in addition to file properties” and then click Apply.

The “Confirm Attribute Changes” window will open.
Select the “Apply changes to drive C:\, subfolders and files” if it is not already and then click OK in the same window.

The window will close and a request for administrator permission appears.
Click on Continue.

The permission request closes and an “Error Applying Attributes” window opens.
Click on Ignore All.

The error will close and the de-indexing of the drive starts.


This process takes a long time, depending on the drive capacity.
When it does finish, click OK on the Local Disk Properties window and restart Windows.
Credit to Dexa for creating this guide.
Schedule a Discussion
Live Chat
Feb. 20, 2024
Appliance Repair Google Listing Suspended? Here’s What To Do
Feb. 13, 2024
How To Set Up Google Local Services Ads for Appliance Repair Companies

Jan. 13, 2023
Revolutionizing Appliance Repair: How ChatGPT is Changing the Game

Sep. 29, 2021
New Fluid Local and Textline Integration

Aug. 05, 2021
Earn More Google Reviews with Fluid Local

May. 21, 2021
New Scheduling Request for Appliance Repair
May. 04, 2021
5 Benefits of Online Appliance Repair Training

Jan. 25, 2021
6 Campaigns for Building Online Communities Instead of Audiences

Nov. 09, 2020
7 Effective Strategies to Improve Your Search Ranking

Sep. 22, 2020
New Updates to GMB Guidelines for Service Area Businesses

Sep. 22, 2020
How Your Business Can Survive and Grow in the COVID Economy
Aug. 25, 2020
How to Optimize a New Windows 10 Pro Installation

Aug. 25, 2020
How to Install Windows 10 Pro on a new PC

Aug. 25, 2020
Work from Home Equipment Guide

Aug. 10, 2020